If there's one practice that artists consistently credit for the biggest improvement in their drawing ability, it's gesture drawing. Quick, timed sketches that capture the energy and movement of a figure rather than precise detail. Done daily for 30 days, it can fundamentally change the way you draw.
What Is Gesture Drawing?
Gesture drawing is the practice of quickly sketching the essential movement, weight, and energy of a subject — usually a human figure — in a very short amount of time. Sessions typically run from 30 seconds to 5 minutes per pose.
The key distinction from observational drawing is the priority. In a careful observational drawing, you're focused on accurate details — the shape of an eye, the curve of a shoulder. In gesture drawing, you're focused on the feeling of the pose: the tilt of the spine, the weight distribution, the flow of one body part into another.
This trains something that's hard to teach directly: the ability to see and communicate action, not just appearance.
Why It Works So Well
The time constraint is the whole point. When you have 60 seconds, you cannot draw every detail. You're forced to identify what matters most and put it down first. Over time, this trains you to:
- Prioritise line decisions. Every mark counts when time is limited. You'll stop second-guessing and start committing.
- Think in movement, not outlines. Rather than drawing the contour of an arm, you start to draw the gesture of an arm — the direction it's reaching, the tension in the muscle, the counterbalance in the shoulder.
- Build a visual library. After hundreds of gesture sketches, you begin to internalise what bodies look like in different poses. This makes it dramatically easier to draw figures from imagination later.
- Lose the fear of the blank page. Nothing kills creative momentum like perfectionism. Gesture drawing trains you to put marks down decisively and move on.
The 30-Day Gesture Drawing Routine
Consistency matters more than duration. Twenty minutes every day is far more effective than three hours once a week. Here's a progressive 30-day structure:
Week 1 — Long poses, focus on flow
Use 2-minute poses. The goal this week is simply to get comfortable with the process. Don't worry about quality. Draw the overall shape of the body — what's the longest line that runs through the pose? Where's the weight? Get something on paper.
Week 2 — Shorter, add volume
Move to a mix of 1-minute and 2-minute poses. Begin to think about the 3D volume of the body, not just the silhouette. Where is the torso twisting? Where is weight pressing down? Try to suggest the thickness of limbs.
Week 3 — 30-second challenge
Introduce 30-second poses. This is where it gets uncomfortable — and that discomfort is where growth happens. You have time for maybe 10–15 marks. What are the 10 most important marks you can make? This forces ruthless prioritisation.
Week 4 — Mixed session
Structure each session as a mix: start with 5–6 quick 30-second poses to warm up, then 4–6 one-minute poses for your main set, and finish with one or two longer 5-minute studies where you can refine the figure. This mirrors professional life drawing sessions.
What to Focus On at Each Timer Setting
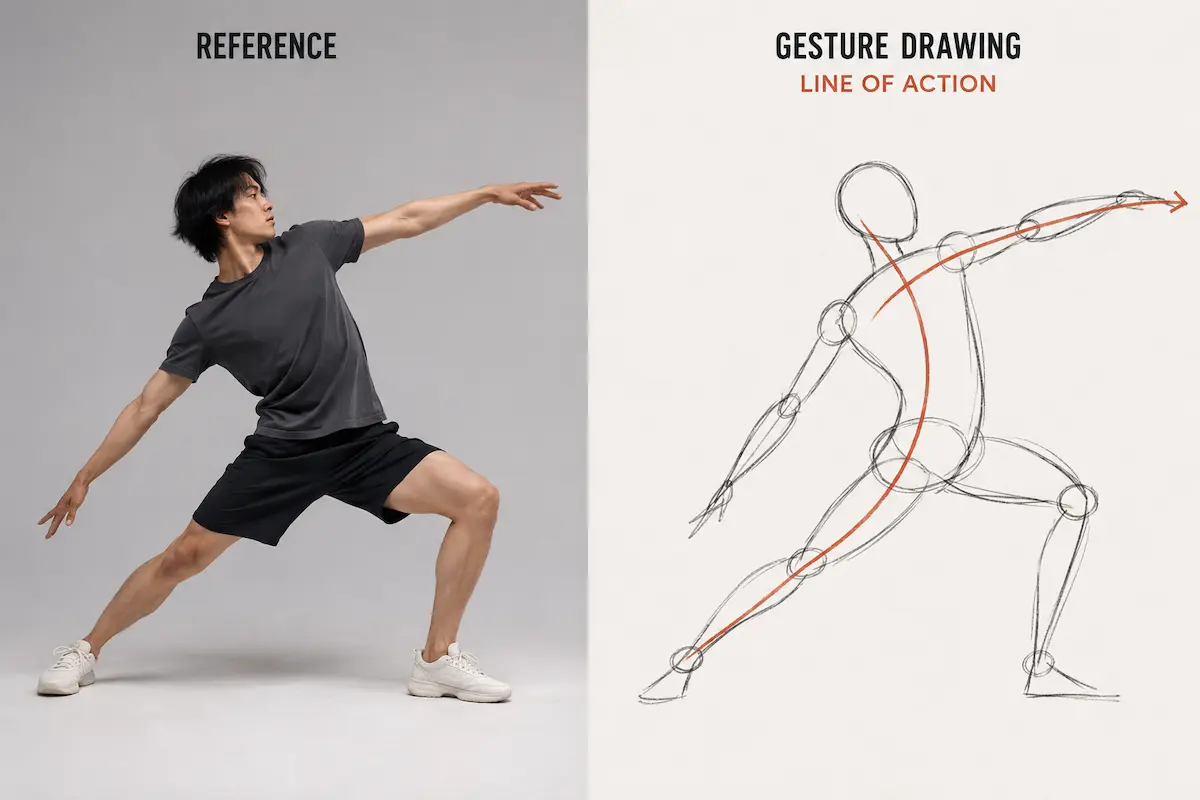
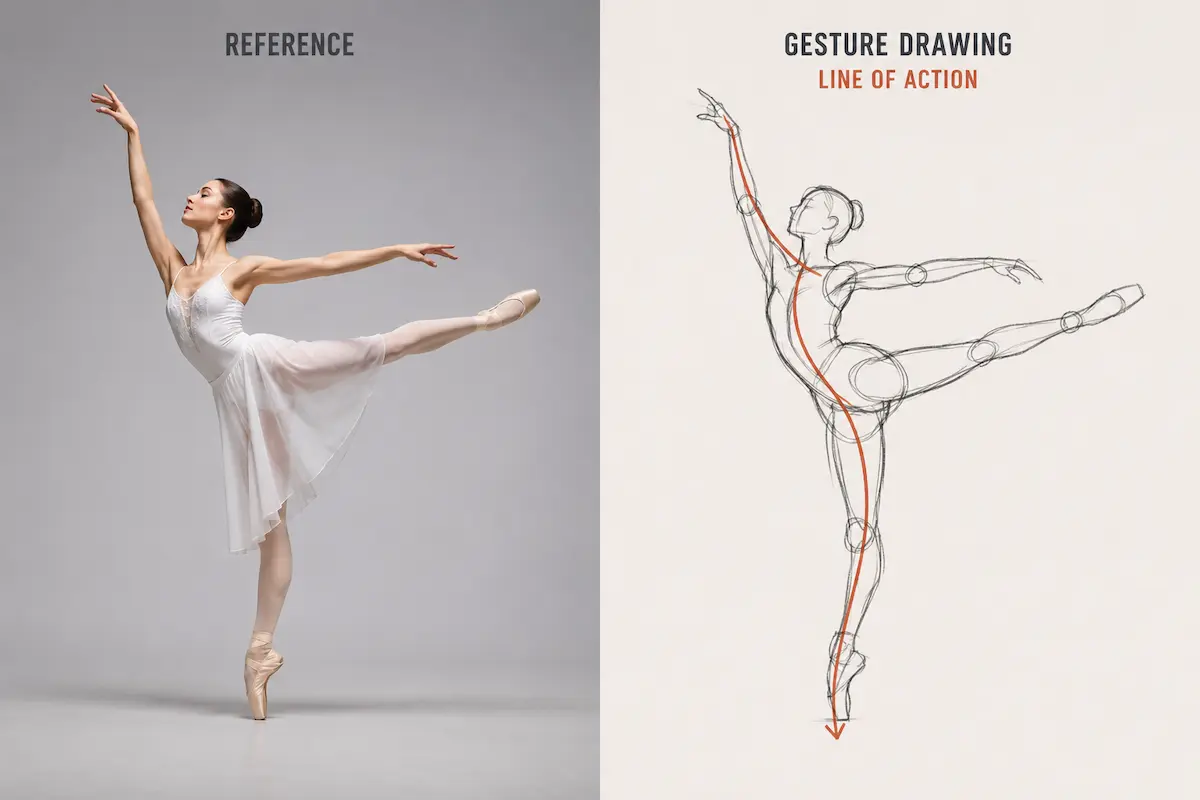
- 10–30 seconds: Line of action only. A single curved or angled line that captures the energy of the pose. That's it. Don't draw anything else.
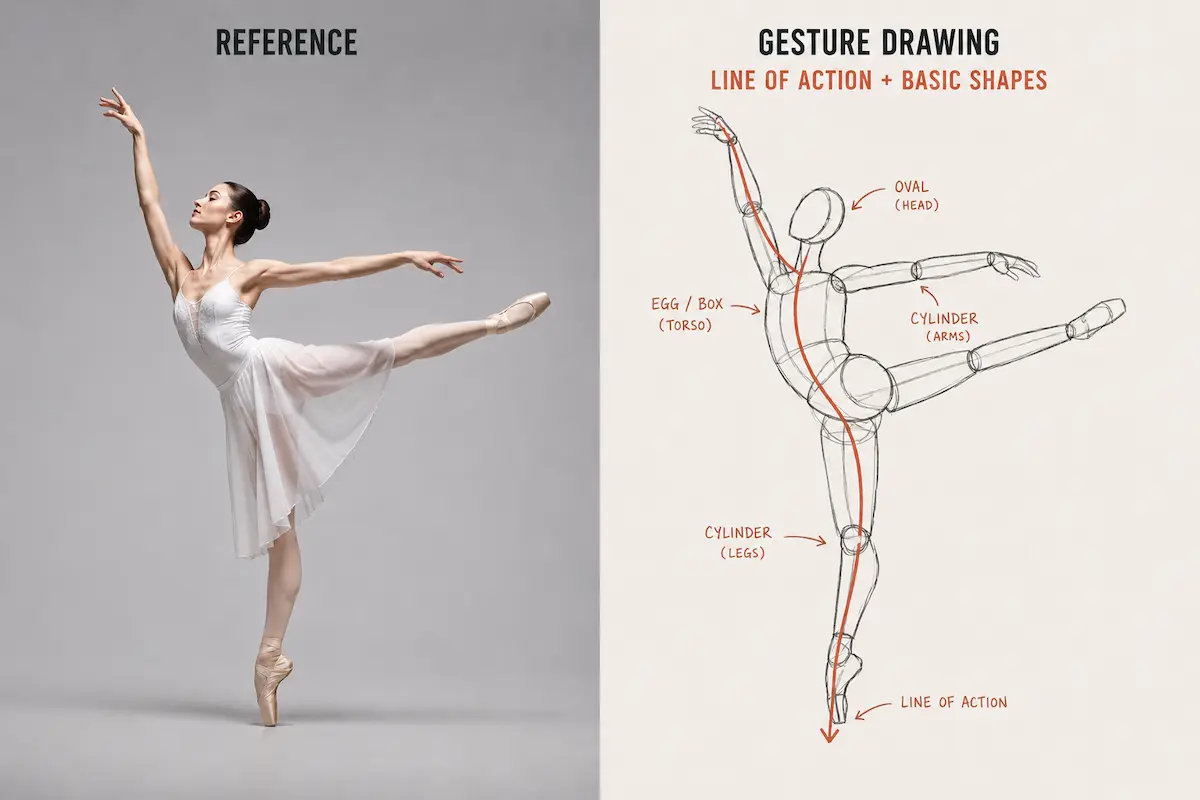
- 1 minute: Line of action + basic shapes. Oval for the head, simple box or egg for the torso, cylinder suggestions for the limbs. Nothing detailed.
- 2 minutes: All of the above, plus weight and contact points. Where is the figure touching the ground or a surface? Where is the visual centre of gravity?
- 5 minutes: Full gesture with refined anatomy. Suggest the major muscle groups, the facial expression, the hands and feet. Still no rendering, but clear structural understanding.
Choosing Good Reference Material
The quality of your reference matters. Look for poses with clear, readable gesture — strong diagonal lines, obvious weight shifts, interesting silhouettes. Avoid photos where the subject is standing perfectly straight with arms at their sides; the gesture in those poses is minimal and you'll learn little from drawing them.
SketchKit's Pose Timer lets you upload your own curated reference set, so you have complete control over what you practice with. Build a folder of dynamic poses and use it across multiple sessions.
Common Gesture Drawing Mistakes
- Starting with the outline. Don't trace the silhouette of the figure. Start from the inside — find the spine, the line of action, the tilt of the hips — and build outward.
- Getting attached to individual sketches. Gesture drawings are disposable. They're practice reps, not finished works. If you're spending time adjusting and erasing, you've missed the point.
- Using 5-minute poses as your default. Long poses feel safer, but they produce slower growth. The most improvement comes from the discomfort of very short poses.
- Skipping sessions when you feel uninspired. Those are often the most important sessions. Consistency beats motivation.
Measuring Your Progress
At the end of each week, photograph your best five gesture sketches. At the end of 30 days, compare your week 1 and week 4 selections. The improvement in line confidence, proportion awareness, and economy of marks is usually striking — even to artists who felt they weren't improving during the process.
The goal isn't polished gesture drawings. The goal is what happens to your overall drawing ability when you return to longer, more careful work. That's where the real reward shows up.